Sinhala Edition English Edition Facebook Official Fanpage Google+ Official Page Official Twitter Account Rss Feed

Photography

Ads spot

Social

Recent

Comments

Beauty

Ads spot

About Us

Showing posts with label wordpress. Show all posts

Free Files of the Month From envatomarcket -හැම මාසෙම නොමිලේ දෙන එන්වෙටෝ මාර්කට් එකේ් මේ් මාසෙ ITEMS

market.envato කියන්නේ ලෝකයේ හොදම මාර්කට් ප්ලේස් එකක් මේකේ විකුනන්නේ පින්තුර තිම්ස් සවුන්ඩ් ක්ලිප්ස් graphic files ,illustrator java programs html programs 3D programs වගේ ප්‍රොජෙක්ට් වලට අවශ්ය හැම දෙයක්ම මේ මාර්ක්ට් ප්ලෙස් එකේ තියනව හැබැයි අද මම කියන්න යන්නේ මැහ මාසෙම  මේ වෙබ් අඩවියෙන් නොමිලේ දෙන සුපිරි දෙවල් ටිකක් ගැන පහල තියෙන්නේ මේ මාසේ ඔයාලට නොමිලේ ලබා දෙන දේවල් ටික 

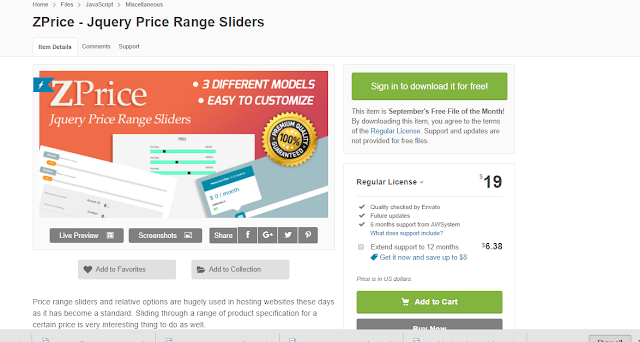
1 - ZPrice - Jquery Price Range Sliders


2 - Unicum - One Page Creative WordPress Theme With RTL Support


3 -  Fire Logo Intro

4 - Creative Agency - A5 Portfolio Brochure

5 -  Dead Elm Tree


මේ වගේ හැම මාසෙම මේ වෙබ් අඩවියෙන් මේ වගේ නොමිලේ දේවල් ඩවුන්ලෝඩ් කරගන්න පුලුවන් ඔයාලට කරන්න තියෙන්නේ පහල තියන ලින්ක් එකට ගිහින් වෙබ් අඩවයේ ගිනුමක් හදාගෙන මේ නොමිලේ දෙන ඒවා ඩවුන්ලොඩ් කරගන්න විතරයි 


කමෙන්ටුවක් දාගෙන යන්න 


How do I Start a Blog and Make Money Online?


This is a step by step and easy to follow guide that will help you setup your own blog from the start. This guide is not to motivate someone to start blogging. It is best suited for someone who already made the decision to start a blog and need some step by step direction of the whole process.

Who Should Use This Guide?
It goes without saying that the following information is for those that know that hard work generates reward.

This guide is intended for anyone who is looking for an answer to any of the following questions:

how do I setup a blog?
how to start a blog and maintain it?
Now, starting a blog is easy but in order to be able to successfully monetize the blog, you need to establish the blog. In this guide, I have also covered the topics that help you establish your blog so you can monetize it.

There is a lot of good content to go through, so it is a good idea to bookmark this page so you can come back to it later and go over the content at your own pace.

Blog Setup (Getting started)


Adding Images to Your WordPress Blog or Website

A picture is worth more than 1,000 words when presented within a blog post (or page). On the web, an image could break up text, which can part the sea of text making it all more readable. An image can also help illustrate a point, and provide SEO value.


Inserting Images Into WordPress Posts or Pages

Using the Add Media within the add/edit post/page screens will give you access to the Media Library.
It will also allow you to upload images that will get auto-resized based on the set thumbnail values for the particular theme that you are working with.
You can set an image as “Featured” or insert it right within the post. When setting as Featured, the theme will have full control over placement and size, and the HTML that gets generated.
When “inserting into a post” you have a little more control. You can certainly decide where the image is placed, and you could choose from some set “classes” to decide on text wrapping, etc.
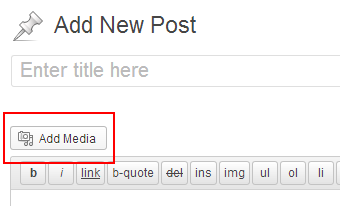
Step 1) Click the Add Media button.
add media button in wp post
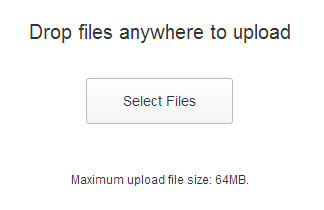
Step 2) Click the Select Files button.
select files to upload screen
Step 3) Locate the image on your computer, and click Open.
You can see the progress meter in the image slot itself, plus in the right side in the Attachment Details window.
You can click the Edit Image text link for basic cropping, and image flipping options. You can choose to have the changes applied to all of the thumbnails that were created during the upload process.
Step 4) Give the image a Title, and preferably a Caption, and Alt Text as well, for some potential SEO value. Some themes, but not many, will incorporate the Description value somehow.
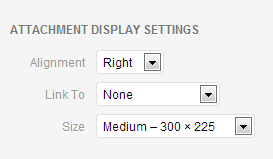
Step 5) Pick an alignment (center, left, right) or leave it as None.
Step 6) By default, the thumbnail image that gets inserted will link to the biggest version of itself (the originally uploaded file). That can be changed to link to an attachment page (some argue that will give the best chance at getting the image into Image search results, if it’s worthy of being there). You can also have a link to a custom URL, or nowhere at all.
Step 7) Finally, choose one of the pre-built sizes. Most often there will be a small square, and a couple sizes that are within aspect ratio of the original, and also a Full Size option. Medium is usually the default.
When using screenshots for tutorials such as this, Full Size should be used so there is no distortion.
media attachment display settings screen
Step 8) Click the Insert into post button.
You will be presented with code similar to the following:
wp-image-embedding-shortcode-example
The id’s and classes may be defined by the theme which will dictate how the image will ultimately look within the blog post (or page) on the site.
Some unique classes will be displayed specific to the image. They will include the image id number, 57 in the example above, which allows you to give the particular image a custom style that will not be used on other images.

Create WordPress blog posts and pages

How to Create a post in WordPress


Creating a post in WordPress is really simple.
  • Login to the WordPress dashboard by visiting www.yourdomain.com/wp-admin
  • Click on ‘Add New’ from the ‘Posts’ menu once you are inside the WordPress admin panel
  • There are four main and important sections in a post that you should fill in before publishing the post
    • The post title
    • Post content
    • Tags
    • Categories
  • Give the post a nice title.
  • Add the post content in the content section.
  • Add relevant tags for this post.
  • Add the post to the relevant category (Create a category if a relevant category doesn’t exist).
  • Publish the post by hitting the ‘Publish’ button.

Few Post Editing How Tos

  • To add a more tag in the post just position the cursor at the appropriate place then click on the ‘Insert More Tag’
  • To create a header text just select the text then chose the desired Heading style
  • To insert bulleted list just click on the Ordered List button
  • To add the post to a Category just tick the desired category from the categories list
  • If a relevant category doesn’t exist then click on the ‘Add New Category’ and add it
  • To add relevant tags just type in the Tags in the Tags box
  • To save the post just click on ‘Save Draft’ anytime
  • To insert an image to the post, just click on the ‘Add an Image button
  • To add/embed YouTube video into your WordPress post simply copy the embed code from YouTube and paste it into your post in ‘HTML’ View. (It’s important that you paste the YouTube code in ‘HTML’ view and not the ‘Visual’ view)

Good Practice Tips

  • Save the post frequently (just in case something goes wrong and you lose power to your computer)
  • Always preview the post before publishing to make sure it looks exactly the way you want it to look.
  • Check spelling. (Reading an article full of spelling mistakes can be very annoying)
  • Do a proof reading and fix the grammatical errors if any.
  • Use the ‘All in all SEO’ WordPress plugin to optimize the post for search engines.

Best and Must Use WordPress Plugins

This page has a list of some of the best WordPress Plugins out there. Check out this list of top WordPress plugins and find out which plugins you should be using to improve your blogging efficiency.

Comment Spam Prevention

  • Akismet – best guard against comment spam for WordPress blog!

Database and File Backup Plugins

  • BackUpWordPress – BackUpWordPress will back up your entire site including your database and all your files on a schedule that suits you.

Search Engine Optimization (SEO)

  • All in One SEO Pack – Out-of-the-box SEO for your WordPress blog. Install the all in one seo pack or the “WordPress SEO by Yoast” plugin (you don’t need to install both).
  • WordPress SEO by Yoast – Yoast’s all in one SEO solution for your WordPress blog: SEO titles, meta descriptions, XML sitemaps, breadcrumbs & much more.
  • Google XML Sitemaps – This plugin generates a XML-Sitemap compliant sitemap of your WordPress blog. This format is supported by Ask.com, Google, YAHOO and MSN Search. The SEO plugins listed above can also do the sitemap for you.

Blog Security Plugin

  • All In One WP Security & Firewall – The All In One WordPress Security and Firewall is the ultimate security plugin that will take your WordPress site’s security to a whole new level.
  • BulletProof Security – BulletProof security plugin offers website security protection against: XSS, RFI, CRLF, CSRF, Base64, Code Injection and SQL Injection.
  • Wordfence Security – The Wordfence WordPress security plugin provides free enterprise-class WordPress security.

Blog Statistics Related

  • Google Analytics Dashboard for WP – Displays Google Analytics reports in your WordPress Dashboard. Inserts the latest Google Analytics tracking code in your pages.
  • Google Analytics – Enables Google Analytics on all pages. This one seems to be simple and does the job. However, the developer doesn’t seem to be very responsive.
  • Google Analytics for WordPress – This plugin used to be really good but since the original developer sold this plugin, it has gone downhill (many users have reported to us that it doesn’t work well anymore). So I would recommend you to use one of the other alternatives listed above.
  • WP Statistics – A comprehensive plugin for your WordPress visitor statistics (doesn’t use Google Analytics).

Caching Plugin

  • W3 Total Cache – The fastest and most complete WordPress performance optimization plugin. After you use the w3 total cache plugin you won’t go back to using WP Super Cache.
  • WP Super Cache – WP Super Cache is a static caching plugin for WordPress. It generates html files that are served directly by Apache without processing comparatively heavy PHP scripts. By using this plugin you will speed up your WordPress blog significantly.

RSS Subscription Related

  • FeedBurner FeedSmith – This plugin detects all ways to access your original WordPress feeds and redirects them to your FeedBurner feed so you can track every possible subscriber.
  • Add to Any: Subscribe Button – Helps readers subscribe to your blog using any feed reader.
  • Category Specific RSS Menu – A simple WordPress plugin to add category specific RSS subscription menu into your posts, pages, sidebars. Very handy when your blog covers multiple topic from non related subjects. This plugin was developed by me.

Contact Forms Related

  • Contact Form 7 – Contact Form 7 can manage multiple contact forms, plus you can customize the form and the mail contents flexibly with simple markup. The form supports Ajax-powered submitting, CAPTCHA, Akismet spam filtering and so on.
  • Contact Form – The Contact Form plugin allows you to implement a feedback form to a web-page or a post in no time.
  • Gravity Forms – Build and publish your WordPress forms in just minutes. No drudgery, just quick and easy form-building.

Social Networking

  • Social Media and Share Icons – Social media plugin which adds social media icons to your website with tons of customization features
  • Share This – This is a very useful plugin that allows your visitors to share a post/page with others. Supports e-mail and posting to social bookmarking sites.
  • Fat Free WordPress Social Share Buttons Plugin – This is a very simple and FAT FREE share button plugin that adds Google plus one, Facebook and Twitter share buttons to your blog posts.

For Google Adsense

  • Simple Google Adsense insertion – Easy to use WordPress plugin to insert Google Adsense to your posts, pages and sidebar.
  • Google Adsense Plugin – Google AdSense Plugin allows you to set parameters of the ads displaying, such as format (text ad, image, text with an image or link), size, color of the elements in the ad block, rounded corners and the ad block position on the website.
  • Google Adsense – The AdSense Plugin enables you to easily use Google’s products – including Webmaster Tools – with your WordPress site.

Photo Gallery Plugin

  • NextGen Gallery – The most popular WordPress photo gallery plugin.
  • Gallery – Gallery is an advanced plugin with a list of tools and options for adding and editing images for different views.

E-commerce, Paypal Donation and Payment

  • WordPress Simple Paypal Shopping Cart – is a very easy to use plugin that allows you to sell products or services online in one click from your WordPress blog. Very useful when you want to sell eBooks or digital products from various posts and pages and need a WordPress Shopping Cart solution.
  • WP Easy Paypal Payment Accept – This is a very easy to use WordPress plugin to Accept donation or Paypal payment for a service or a product in one click. Handy when you are trying to put a customized payment widget on your site (you can add it to the sidebar or a page or a post of your blog).
  • WordPress eStore – This plugin provides a complete solution to sell products from your site. It is really good for selling digital products securely from your WordPress blog.
  • WordPress Donations Widget Plugin – The WordPress Donations Widget Plugin allows you to collect donation for a cause from your WordPress powered site.
  • PayPal for Digital Goods – This plugin allows you to use the PayPal for Digital Goods gateway to accept payment for digital goods. Provides inline checkout of digital goods.
  • Stripe Payments – A simple and lightweight plugin to accept payment on your site (for a product or service) via the Stripe payment gateway.

Membership Plugin

  • Simple Membership Plugin – The simple membership plugin lets you protect your posts and pages so only your members (free or paid) can view the protected content.
  • WordPress eMember – WP eMember is a feature rich membership plugin that can turn your existing or new WordPress site into a powerful membership site.

Affiliate Related

  • WP Affiliate Platform – WordPress plugin for affiliate recruitment, management and tracking. This plugin lets you run your own affiliate campaign/program and allows you to reward (pay commission) your affiliates for referred sales.

Software License Management

  • Software License Manager – This plugin allows you to create a software license management solution for your web applications (WordPress plugins, Themes, PHP based membership script etc.)

Other Very Useful Plugins

  • Yet Another Related Posts Plugin –  This plugin gives you a list of posts and/or pages related to the current entry, introducing the reader to other relevant content on your site.
  • Download Monitor – This plugin is very useful for managing and tracking your digital file downloads. You can track which file is being downloaded how many times and who is downloading them.
  • Executable PHP Widget – Like the Text widget, but it will take PHP code as well. Very handy for inserting custom ‘php’, ‘html’, ‘javascript’ in the sidebar.
  • Crayon Syntax Highlighter – A plugin to highlight any code in your posts or pages. very handy if you use example codes in your Blog.
  • Mailpoet Newsletters – Send newsletters, post notifications or autoresponders from WordPress easily, and beautifully.
  • WP-Polls – Adds an AJAX poll system to your WordPress blog. Allows you to easily include a poll into your WordPress’s blog post/page.
  • EWWW Image Optimizer – The EWWW Image Optimizer is a WordPress plugin that will automatically and losslessly optimize your images as you upload them to your blog.
  • WP Video Lightbox – The WordPress Video Lightbox plugin allows you to embed videos on a page using lightbox overlay display. This plugin can be used to display images, flash, YouTube, Vimeo, iFrame etc in a nice lightbox overlay.

WordPress Theme Choosing Tips and Resources

Choosing a WordPress theme that will go good with the content of your blog and will stand the test of time is not an easy task. Sometimes it takes days for me to find that ultimate WordPress theme that I really like and has all the essential features that I want. I spend more time choosing a theme upfront even though the WordPress theme of a Blog can be changed anytime is because sometimes it can be a hassle to change the theme in the middle when I have made a lot of custom changes to the existing WordPress theme.


Non Technical side of things


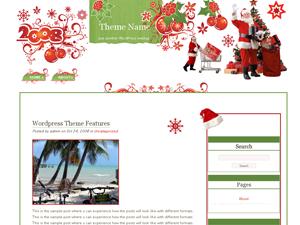
  • The first thing to pay attention to when choosing a WordPress Theme for your blog is the look and feel of the theme. Look and feel of a theme is very important. You want your visitors to feel comfortable when browsing your site. I try not to choose a theme that hurts the eye at the first look. The theme also gives your visitor an idea about your blog’s content. So try to choose a theme that’s relevant to the content. For example, if your blog is about Christmas then try to choose something like the following:
Possible Theme for a Christmas Blog
I would avoid choosing a theme like the following for the Christmas blog as it doesn’t give a Christmas expression:
Possible Bad choice of theme for a Christmas Blog
  • The second thing to look at when choosing a theme is the theme layout like how many columns it has, does it have a bottom bar? etc. The reason I think the theme layout is important is because if you are thinking about earning money from your blog later by selling ad space for example then a theme with three columns may give you more space than a two columns theme.
  • Finally, you want to look at the different pages of the theme (single post, pages, archives, categories etc) and make sure it doesn’t have any major flaws. Make sure that the body content section has the same width, the sidebar is visible etc.
  • Make sure the theme has valid code by default. Run your website through a Markup Validation service like W3C with a default setup of the theme. You don’t want to start with a WordPress theme that has coding error in the default setup.
  • Make sure that the WordPress theme you are choosing supports latest WordPress features like Widgets, Tags etc.
Remember, even though most of these theme related flaws are changeable but you may end up spending a lot time fixing it when you can save all those valuable time just by choosing a theme that already has the things you want by default.

Technical side of things to look for in a theme

How to Install WordPress on Your Domain

WordPress Installation Steps

Step 1: Transfer the WordPress files to your web server

  • Download and unzip the latest WordPress package from WordPress Download Page.
  • Upload the WordPress files (all the directories and files that is inside the extracted WordPress Directory) to the root directory (In most cases this will be the ‘public_html’ directory) of your web server or to a sub directory if you want to host your blog in a sub directory of your site. I use FileZilla (free ftp software) to upload my files but any ftp program can be used.


Step 2: Add Database and User for WordPress

  • Log in to your cPanel. (http://www.your-site.com/cpanel)
  • Click MySQL Databases.
    MySQL Database
    MySQL Database
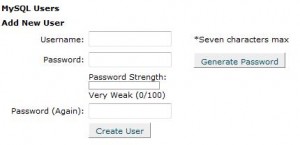
  • Create a user for WordPress from the Users section:
    MySQL Database User Creation
    MySQL Database User Creation
    1. Choose a user name (e.g. ‘user’) and enter it in the User name field.
    2. Choose a password for this user. Write down this password on a piece of paper or on a text file.
    3. Click Add User.
    4. Click on ‘Go Back’ to go to the MySQL Database Page Write down this user name and password on a piece of paper or on a text file.
  • Create a database for WordPress from the Databases section.
    MySQL Database Creation
    MySQL Database Creation
    1. Enter a name for your WordPress database (e.g ‘wordpress’) and click ‘Create Database’.
    2. Click on ‘Go Back’ to go to the MySQL Database Page.
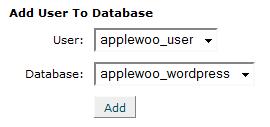
  • Go to the ‘Add User To Database’ section on this page and select the Database and user name you just added from the drop down menu if not selected already.
    Add WordPress User to the Database
    Add WordPress User to the Database
  • Click ‘Add’.
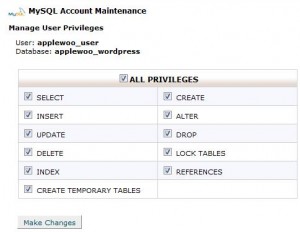
  • Select “ALL PRIVILEGES” and click ‘Make Changes’.
    WordPress User's Privilege Settings
    WordPress User
  • Click on ‘Go Back’ to go to the MySQL Database Page.
    List of Current Database and Users
    List of Current Database and Users
Note down the WordPress Database and user name that you just created from this (MySQL Database) page. There may be a prefix present on your Database and user name e.g “applewoo_wordpress”, “applewoo_user”, this is to ensure that no name conflicting occurs on a shared hosting.

Step 3: Edit the Configuration File

  • Rename the “wp-config-sample.php” file to “wp-config.php”.
  • open the “wp-config.php” in your favorite text editor and update the DB_NAME, DB_USER, DB_PASSWORD fields with the details captured in step 2. It should look similar to the following:

// ** MySQL settings ** //
define('DB_NAME', 'applewoo_wordpress'); // The name of the database
define('DB_USER', 'applewoo_user'); // Your MySQL username
define('DB_PASSWORD', 'myPassword'); // ...and password
define('DB_HOST', 'localhost'); // 99% chance you won't need to change this value
define('DB_CHARSET', 'utf8');
define('DB_COLLATE', '');
  • Upload this updated “wp-config.php” file to the root directory (‘public_html’) of your web server or to the sub directory if you are installing WordPress in a sub directory of your site.

Step 4: Install WordPress

  • Run the WordPress Installation script by visiting the ‘wp-admin/install.php’ link of your site. Basically enter “http://www.your-site.com/wp-admin/install.php” in the address bar of your web browser and follow the one click installation process.
WordPress should now be installed and ready to go. Log in to your WordPress admin section by visiting the ‘wp-admin’ link of your site using the user name and password sent to your inbox.
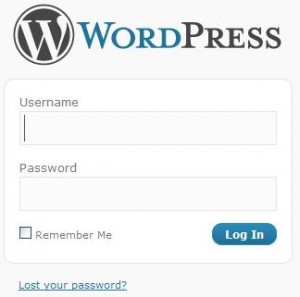
WordPress Login Screen

Total Expected WordPress Install Time

The total WordPress install time will vary depending on your internet connection speed but below is a graph showing the average install time for my WordPress Install.
Total WordPress Install Time
The WordPress installation is fairly straight forward but If you are having a problem then leave a comment below and I will try to answer if I can.